![]()
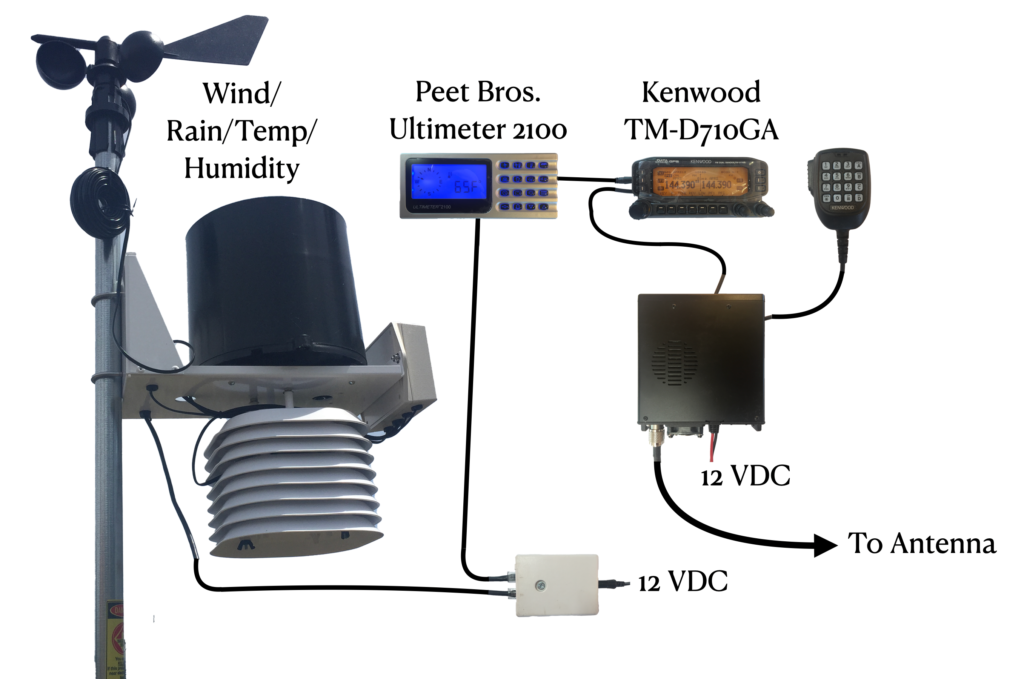
Peet Bros. ULTIMETER weather stations can send their observations to the APRS network through a TNC (terminal node controller) and a VHF radio. Since the Kenwood TM‑D710GA UHF/VHF radio has a built-in TNC, one can use just a TM-D710GA with an ULTIMETER 2100, leaving only the task of equipment configuration.
Connections
Providing a data connection from an ULTIMETER 2100 weather station to a TM‑D710GA radio is simple using the Peet Bros. SCF‑00400 interface cable. Just connect the cable between the two devices by plugging one end into the modular jack on the right side of the ULTIMETER 2100 and the other end into the 2.5-mm sub-miniature phone jack on the left side of the TM-D710GA’s display unit. We note that the Peet Bros. cable costs less than a modular-plug crimp tool, but if you want to build your own cable anyway, the pinout is below.

The remaining connections are shown in the system diagram below.
Configuring the Kenwood TM-D710GA
Note: The menu system of the TM‑D710GA differs from the menu system of the older TM‑D710A. These instructions are written for the TM‑D710GA. The most important difference is that the internal GPS of the TM‑D710GA must be switched off using the soft button to set WXI mode. Otherwise the transmitted TM-D710GA packets will be invalid.
Using the TM-D710GA’s Buttons and Menus
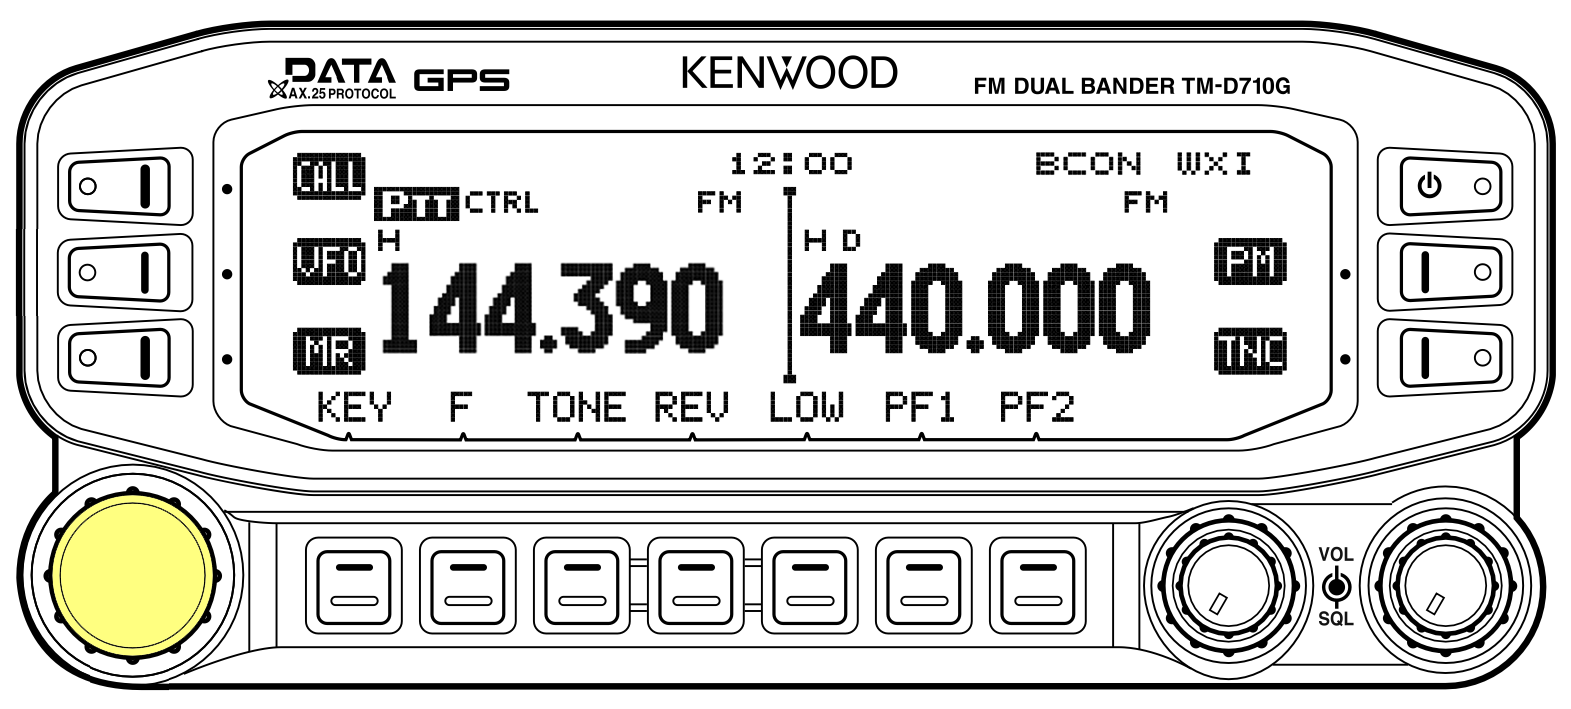
The radio has soft buttons along the bottom and sides, as highlighted in the figure below.
![]()
We indicate the button to press by showing outlined button text. For example
means to press the button, which in the figure is the button closest to the button text.
Note: If the instructions indicate button text that is not on-screen, then press the button once or twice to show the other sets of button text on the bottom row. Also note that pressing the button changes the button text on the left and right sides. If you inadvertently press the button, you can return to the original button set by pressing the button.
These instructions refer to the radio’s leftmost knob as the (Dial).
You press and rotate the (Dial) to configure the radio through a set of menus. Since the sequence of alternating presses and rotations of the (Dial) is similar for all menus, for brevity, we use a simple textual notation to indicate the menu, menu item, and value that is needed. For example the instruction
APRS --> BASIC SETTINGS 600 --> BEACON TYPE = APRS
means to
- Press
- Press (Dial)
- Rotate (Dial) to show
APRS - Press (Dial)
- Rotate (Dial) to show
BASIC SETTINGS 600 - Press (Dial)
- Rotate (Dial) to select
BEACON TYPE - Press (Dial)
- Rotate (Dial) to select
APRS - Press (Dial)
- Leave the menu with the button.
Step 1: Reset the Radio (Optional)
This document assumes that the radio starts from a full reset, which is recommended. However, if you already are familiar with programming the TM‑D710GA and understand these instructions, then you can skip the reset step and configure the radio from its current state.
If you decide to reset the radio, perform the following step. All prior programming will be lost.
AUX --> RESET 999 --> FULL RESET
Step 2: Set Mic [A] as Frequency Entry
To simplify frequency entry, set the button of the microphone to select direct keypad frequency entry.
AUX --> MIC PF4(CALL) 911 --> ENTER
Step 3: Program APRS Memory
You choose either the left or right band by pressing one of the two volume knobs, which are indicated in the figure below.

Use the left band for APRS.
- Press the left volume knob.
In the United States, APRS transmissions use 144.390 MHz. Enter this frequency.
- On the Microphone press .
Disable the tone:
- Repeatedly press until no tone indicator appears above the frequency. The displayed tone indicators in order are T, CT, DCS, D◢ 0, and then the desired setting of no tone, which literally shows no tone indicator.
Set power level:
- Choose a power level and press until the desired power level
L,M, orH(5W, 10W, 50W) appears immediately above the frequency.
Store in memory. If you started by reseting the radio, then memory 0 is
available.
- Rotate (Dial) to select a memory number with an open triangle.
Name the memory “APRS”:
- Press the right volume knob.
- If necessary, rotate (Dial) to select the memory with 144.390 .
MEMORY --> MEMORY NAME 200 --> APRS
Step 4: Set the Date, Time, and Time Zone
Set the radio’s date and time so that its displayed log entries are valid.
AUX --> DATE 925 -->set current dateAUX --> TIME 926 -->set current timeAUX --> TIME ZONE 927 -->set the current time zone, for example-08.00for PST
Step 5: Set Call Sign, Beacon Type, and Lock
Set the APRS call sign to use for transmissions. Use your amateur-radio call sign and append “–13” to indicate that the transmission is from a weather station.
APRS --> BASIC SETTINGS 600 --> MY CALLSIGN =yourcallsign-13APRS --> BASIC SETTINGS 600 --> BEACON TYPE = APRSAPRS --> BASIC SETTINGS 600 --> APRS LOCK = FREQUENCY & PTT
Step 6: Internal TNC Settings
Verify these settions.
APRS --> INTERNAL TNC 601 --> DATA BAND = A-BANDAPRS --> INTERNAL TNC 601 --> DATA SPEED = 1200 bpsAPRS --> INTERNAL TNC 601 --> DCD SENSE = D or RxD BANDAPRS --> INTERNAL TNC 601 --> TX DELAY = 200 ms
Step 7: GPS Port for Weather Data
Program the radio to accept data from the Peet Bros. ULTIMETER 2100:
APRS --> GPS PORT 602 --> BAUD RATE = 2400 bpsAPRS --> GPS PORT 602 --> INPUT = WEATHER(Peet Bros.)APRS --> GPS PORT 602 --> OUTPUT = OFF
Step 8: Enter Fixed Latitude / Longitude
Since we will be disabling the GPS to prevent packet corruption, we must set the weather station’s position manually. Choose a location name for your own convenience. This field is not transmitted, but the latitude and longitude are.
APRS --> MY POSITION 605 --> NAME =location nameAPRS --> MY POSITION 605 --> LATITUDE =location latitudeAPRS --> MY POSITION 605 --> LONGITUDE =location longitude
If you didn’t reset the radio earlier and it has more than one position, use the weather station’s position memory by entering the MY POSITION 605 menu and turning the (Dial) to select the weather station’s position. Then press
The position memory in use has an asterisk to the left of its number.
Step 9: Set Comment Text
Traditionally APRS weather stations transmit an indication of the equipment that they use. We can set the radio to send periodic beacons with this or any other equipment list.
APRS --> STATUS TEXT 608 --> TEXT = Peet Bros. ULTIMETER 2100 & TM-D710GAAPRS --> STATUS TEXT 608 --> TXT RATE = 1/1
If you didn’t reset the radio earlier and there is more than one defined status text, use the status text memory by entering the STATUS TEXT 608 menu and turning the (Dial) to select the desired status-text memory. Then press
The status-text memory in use has an asterisk to the left of its number.
Step 10: Set Station Icon
Ensure that the weather station is represented by a WX icon on APRS maps.
APRS --> STATION ICON 610 --> WX(Weather station)
As confirmation, the symbol (WX) will be shown along with _ for the symbol and / for the table.
Step 11: Set Beacon TX Algorithm
Ensure that the beacon transmits once an hour.
APRS --> BEACON TX ALGORITHM 611 --> METHOD = AUTOAPRS --> BEACON TX ALGORITHM 611 --> INITIAL INTERVAL = 60 minAPRS --> BEACON TX ALGORITHM 611 --> DECAY ALGORITHM = OFFAPRS --> BEACON TX ALGORITHM 611 --> PROPORTIONAL PATHING = OFF
Step 12: Adjust Path (optional)
Depending on the configuration of the APRS network in your location, you may want to adjust the PACKET PATH. Note that when choosing the TYPE you must select it by pressing the button. Then the TYPE will be prefixed by an asterisk.
For my area, I limited packets to one hop in Northern California, as shown in the example below, but you should check with your region’s APRS coordinator for your area’s recommendations.
APRS --> PACKET PATH 612 --> TYPE = *STATE/SECTION/REGIONAPRS --> PACKET PATH 612 --> ABBR = NCAAPRS --> PACKET PATH 612 --> TOTAL HOPS = 1
Step 13: Disable Beeps
The radio will beep with each APRS packet received. If you want to disable this feature, follow these steps.
APRS --> SOUND 624 --> RX BEEP = OFFAPRS --> SOUND 624 --> TX BEEP = OFFAPRS --> SOUND 624 --> SPECIAL CALL =APRS --> SOUND 624 --> APRS VOICE = OFF
Step 14: Enable Weather Transmissions
APRS --> WEATHER STATION 615 --> TX = ONAPRS --> WEATHER STATION 615 --> TX INTERVAL = 5 min
Step 15: Enable TNC
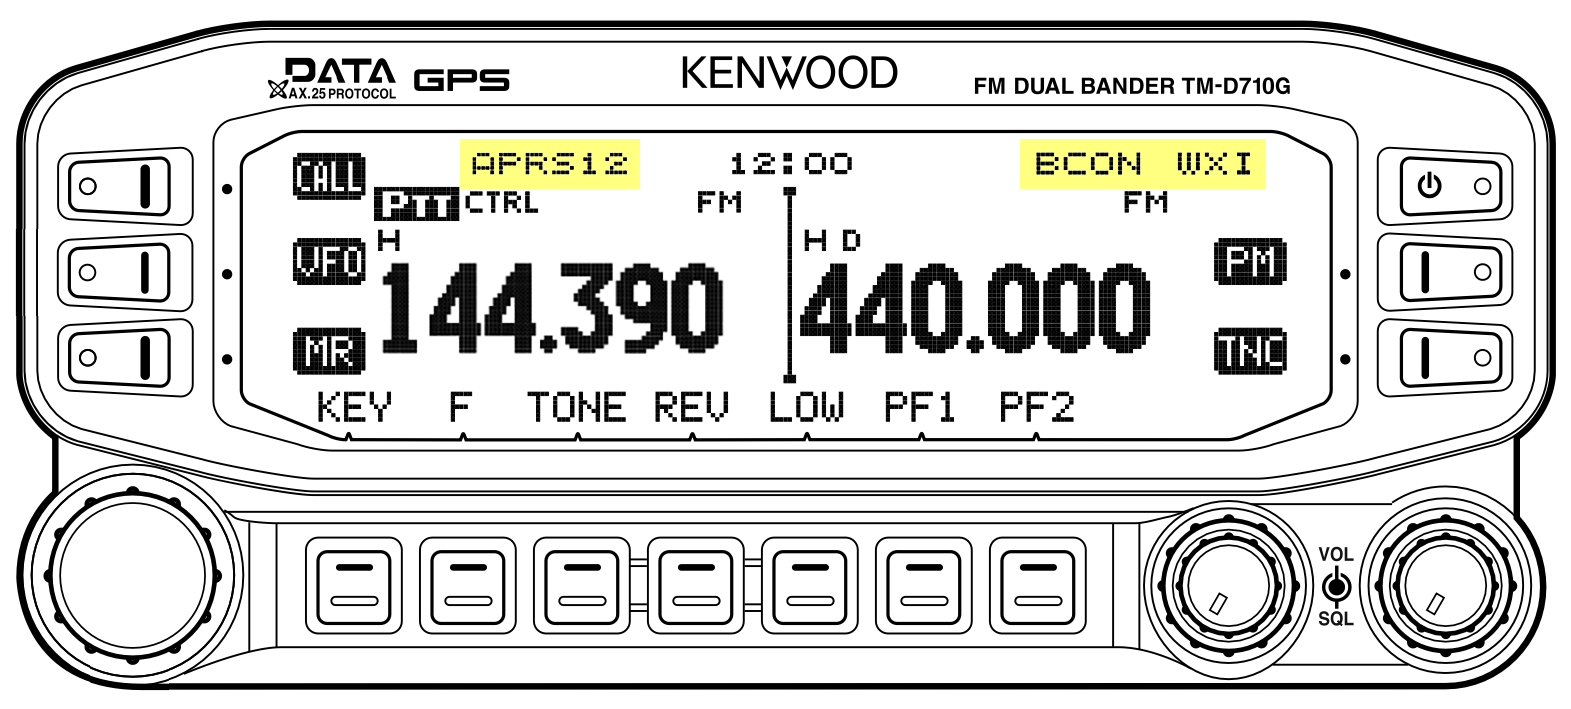
Now we will enable the radio’s TNC. The top line of the TM-D710GA’s display shows status text.
- The button is on the right side of the screen. Press it once or twice to make the TNC status APRS12 appear near the top left.
- The button is at the bottom of the screen. Press it to make the GPS status WXI appear at the top right. (You may need to press once or twice to show the set of soft buttons that includes .)
- The button turns on the transmission of beacons. Press it once or twice to make the beacon status BCON appear near the top right. (You may need to press once or twice to show the set of soft buttons that includes .)
Configuring a Peet Bros. ULTIMETER 2100
The ULTIMETER 2100 weather station can send data out of its serial port using any of several formats, but the TM‑D710GA requires the weather station to use Packet Mode.
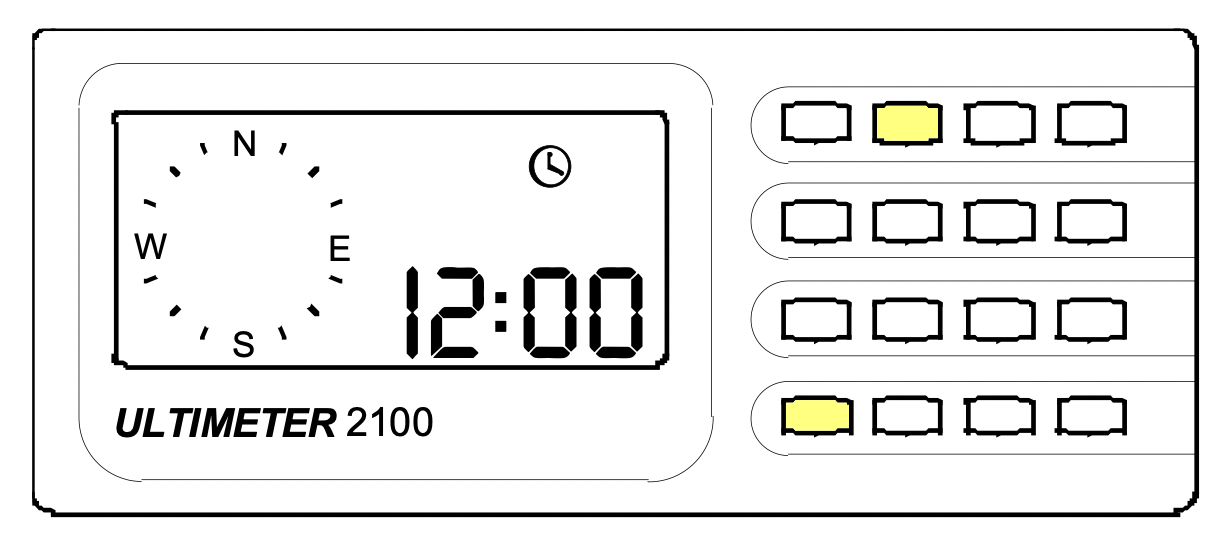
To set Packet Mode, hold the Clear and Wind Chill buttons for 3 seconds. This diagram indicates the positions of these two buttons on the ULTIMETER 2100’s keypad.
Testing
At this point you can go to the web site aprs.fi and search for yourcallsign-13 to see if your weather station is transmitting. It could take as long as 10 minutes for the first packet to be received, but after that the data will be updated every 5 minutes. If the map shows your station with weather data, you can click on show weather charts to see the data history.
If you have an account at the web site, you can use the the Raw packets link, which can help confirm that data is being received reliably.
Debugging
While creating these instructions, I discovered several things could go wrong.
On the TM-D710GA:
- Power too low. Initially, I had the radio’s transmission power set to 5 watts, which was too low to be received reliably. If you need to increase the power, since you already have saved an APRS memory (Step 3), you will need to update it so that the new power setting is saved. After increasing the power, repeat Step 3. When instructed to select a memory with an open triangle, instead select the existing APRS memory so that you will overwrite it.
- Forget to press . The weather was being received at aprs.fi, but the comment text with the equipment list was missing because beacon packets were not being sent. See Step 15.
- GPS setting not WXI. This was a difficult one! If you leave the internal GPS receiver enabled (iG&W mode) the radio’s TNC will transmit invalid packets. You can see this by checking aprs.fi’s raw page. It will report this condition by showing all packets in red text with an error message appended [Invalid uncompressed location]. To fix this problem, press the button to switch to WXI mode. See Step 15.
- Misspell call sign. I had appended –13 to my call sign in the radio’s configuration, but when searching using aprs.fi, I forgot to include the –13 in the search text, and so no packets were shown.
- Wrong baud rate for interface to weather station. No weather-data packets will be sent. See Step 7.
- Leave BEACON TX ALGORITHM set to MANUAL. No beacon packets will be sent. See Step 11.
On the ULTIMETER 2100:
- Setting the ULTIMETER 2100 to anything but Packet Mode. The radio will ignore data in all other packet formats. Note that the TM‑D710GA will not accept data in Multiple Packet Mode, even though this mode transmits Packet Mode data every 5 minutes. In fact, it appears that after the TM‑D710GA radio receives data in Multiple Packet Mode, it will need to be restarted in order for it to properly receive data in Packet Mode again.