(April 27, 2014: Links updated.)
Note: If you already have an HSMM-MESH node and you want to upgrade its firmware, see HSMM-MESH: Upgrading the Firmware.
I knew nothing of HSMM-MESH (High Speed Multi-Media Mesh) when I read that Joe Fisher, K5EJL, would be presenting at the August 5, 2011, club meeting. The announcement was intriguing, however, and after reading several articles on the project’s web site http://www.broadband-hamnet.org, I decided to get a pair of LinkSys WRT54GL wireless routers and give it a try. This article describes how I got started and what I learned along the way.
HSMM-MESH is a digital communication mode that lets computers communicate using WiFi networking hardware on amateur-radio bands. The scheme that the mode provides is not limited to single point-to-point links: equipment automatically manages the routes of the mesh network, rerouting as necessary around broken network links. So this sounds great, but . . . why do I care?
When All Else Fails Amateur Radio Works
Wildfires of recent years and the vandalism of ten fiber-optic cables in April of 2009 revealed to me that our society’s communication infrastructure is fragile, undefended, and lacks adequate redundancy. Of course I can do nothing about these commercial networks, but I can imagine creating a parallel, high-speed digital network that is tested weekly during the local nets.
Details of such a future network are, as one says, to-be-determined, but the building blocks surely will include wireless links and automatic routing. So it only made sense to me that I start to play with new equipment, learn and apply new techniques, and evaluate potential facility locations of such a network.
Getting Started
Although I have said “WiFi networking hardware,” the software that runs on the equipment is not WiFi—it is developed by hams. Using one of the last menu items in the wireless router’s admin page, I directed the router to upload the amateur radio software image into its non-volatile memory. Here’s how I did that.
Step 0: I started by printing these instructions
http://www.broadband-hamnet.org/documentation/68-firmware-installation-instructions.html
Why did I print the instructions? Because configuring the router eventually required me to disconnect my computer from the internet. Not immediately, but eventually. At that point, I no longer could browse back to the instructions! Of course if you don’t want to print the instructions, you can keep another browser open to the instruction’s page and be careful not to refresh it.
You should print this article, too, since I mention a few clarifications.
Since I had purchased two new WRT54GL routers, for each one, I followed instructions for a stock router.
Step 1: I browsed to the broadband-hamnet.org software download page and downloaded the latest software image for the WRT54G and WRT54GL.
- Browse to http://broadband-hamnet.org
- Click User Documentation in the left navigation area.
- Click the article Firmware Installation Instructions
- In the paragraph of step 1, click software download page.
- Click Linksys Firmware.
- Get the latest HSMM-MESH firmware. (On April 27, 2014, I found bbhn-1.0.0-wrt54g.bin, but you might find a later version.) Ensure that the file name you get ends with your router’s model number, such as wrt54g.bin.
The instructions don’t mention one very important step, and so I’ll put it here. After connecting a computer to one of the four LAN ports on the back of the WRT54GL, I needed to disable the wireless link of my laptop. So I’ll list that step here. You see, although this is a wireless router, we reconfigure it over a wire!
Step 1.5: Turn off the wireless link of your laptop, and connect the laptop’s network cable to one of the WRT54GL’s four LAN ports. At this point, your computer should have no network connections, wired or wireless, except for the cable going to the WRT54GL.
Step 2: I followed the instructions for “routers with factory firmware”. Since I saw the instructions required two chages, here they are as I followed them:
- in a browser go to http://192.168.1.1
- user = admin
- password = admin
- click Administration
- click Firmware Upgrade
- click Browse and select the file you downloaded, such as bbhn-1.0.0-wrt54g.bin
- click Upgrade
Step 3: I waited for the router to reboot and blink its LEDs as described in the instructions. Then I unplugged the network cable and plugged it in again to get the laptop to reset its network connection.
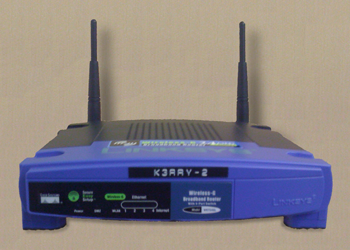
Step 4: Finally, I followed the instructions to store my callsign as part of the router’s name. As the control operator, this final step is required before using the device. I called my two HSMM-MESH nodes k3rry-1 and k3rry-2.
After transforming both WRT54GL routers into HSMM-MESH nodes, I could browse to the control panel of HSMM-MESH node k3rry-2:
http://localnode:8080
Then I asked for the mesh network’s status, and the web page listed that k3rry-2 could see node k3rry-1!
What’s Next?
So that’s how I got started. If you want to get started yourself, you can buy a pair of new WRT54GL routers, or you can use some old WRT54G (no L) routers. The current WRT54G (no L) will not work for HSMM-MESH because it was cost reduced to use half of the memory. You’ll need to get an old WRT54G (up to version 4) or any version of WRT54GL. The hsmm-mesh.org web site describes which versions of which routers will work. See the list of supported hardware.
In the next article I’ll describe how I got a couple of computers to talk to one another. I’ll address the mystery of why I needed to put :8080 on the end of the address above.