 My other article HSMM-MESH: My First Experience explains how to convert a factory-fresh WRT54GL wireless router into an HSMM-MESH node. This article explains how to update the firmware of a WRT54GL router that already has been configured as an HSMM-MESH node.
The WRT54GL router described here is running firmware version 0.4.1 and is being upgraded to run version 0.4.2.
Materials
- WRT54GL wireless router that already is configured as an HSMM-MESH node. You will need to know the node’s administrator password.
- Laptop computer with an RJ-45 network connection.
Procedure
Note: These instructions direct you to download a firmware file to the hard drive of the laptop computer before uploading it to the router. I am aware of a shortcut that downloads the new firmware directly from the internet into the router without first storing it on the laptop’s hard drive, but to minimize risk, I am going to skip it.
Step 1: Print these instructions.
Step 2: Browse to http://hsmm-mesh.org/download/firmware/index.html, and download the “firmware for existing mesh nodes” to the laptop computer’s hard drive. The file name will end with .trx
Step 3: Turn off the wireless link of the laptop.
Step 4: Connect the laptop to one of the LAN ports of the WRT54GL.
Step 5: Browse to http://localnode:8080
Step 6: Click the “Setup” button.
Step 7: Enter the name “root” and mesh node’s administrator password.
Step 8: Click the “Administration” link.
Step 9: Next to “Upload Firmware” choose the .trx file that you just downloaded.
Step 10: Click the “Upload” button.
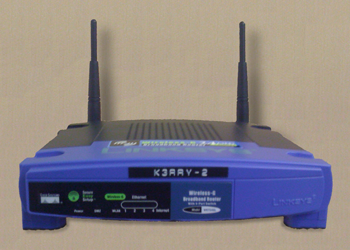
At this point, the LEDs on the front of the router will blink. You need to wait for the following state changes: the “Power” LED will start blinking at about a 4-Hz rate, then it will stop blinking, and finally the DMZ LED will extinguish. You may see the laptop’s browser reload with a page of similar instructions.
Step 11: When all LEDs stop blinking and the DMZ LED is out, browse to http://localnode:8080/cgi-bin/status .
At this point, your WRT54GL has had its memory wiped, and so you need to reset its password.
Step 12: Click the “Setup” button.
Step 13: Enter the name “root” and the password “hsmm”.
Step 14: Confirm that the Node Name is set correctly.
Step 15: Enter the node’s password twice.
Step 16: Click the “Save Changes” button.
Wait for the WRT54GL to reboot, and browse to the node’s status page. You should see that the firmware version has been upgraded.